If you’re like me, you love Peace Lilies for their elegant white blooms and lush green leaves. They bring a calm, natural vibe to any room, and honestly, they’re one of my favorite low-maintenance plants. So, imagine my surprise when I noticed some black spots on those lovely leaves. It’s not exactly the look I was expecting!
After a bit of a freak-out (it happens!), I did some research and tried a few tricks. Luckily, I managed to get to the root of the problem and bring my Peace Lily back to its healthy, vibrant self. So, if you’re facing the same black-spot issue, let’s go through the possible causes and what you can do to bring your Peace Lily back to life.
1. Overwatering: My First Mistake
Peace Lilies love moisture, but they’re not huge fans of sitting in water. I thought I was doing a good job by keeping the soil consistently moist, but it turns out I was overdoing it. Too much water leads to root rot, which can show up, as, you guessed it, “black spots on the leaves.”
What I Did to Fix It
Checked the Soil Moisture
Now, I make sure to feel the soil before watering. If it’s still damped an inch down, I hold off.
I found a trick that helps: lift the pot when it’s dry, then again after watering. Right after you water, lift the pot to get a feel for its weight when the soil is fully hydrated. It’ll feel heavier because the soil is holding onto the water.
After a few days, or whenever you think it’s time to water again, lift the pot again. By now, some water should have evaporated or been used by the plant, so it’ll feel noticeably lighter. When the pot feels light, it’s usually a sign that the top inch or so of soil has dried out, indicating it’s time for another drink.
Made Sure the Pot Drains
The water needs somewhere to go, so I made sure my Peace Lily’s pot had good drainage holes. I even switched to a well-draining soil mix for houseplants, which was a game changer.
If you think you’ve been overwatering for a while, check the roots. Healthy ones are white; if you see dark, mushy roots, trim those off and repot in fresh soil.
2. Fungal Infections: Those Little Spots Can Spread Fast
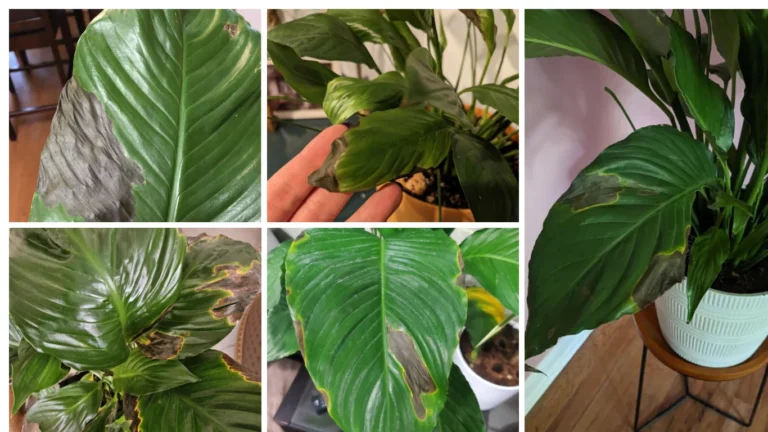
Fungal infections are surprisingly common in Peace Lilies, especially if there’s extra moisture on the leaves. When I was a beginner, I used to mist my plant regularly to boost humidity, not realizing it might be causing those tiny black spots to pop up. One day, I noticed black spots on some of the leaves, which were small and dark, with a yellowish halo around them. At first, I didn’t think much of it, but as the spots spread, it made me worried.
What I Did to Fix It
Switched from Misting to a Pebble Tray
Instead of misting (which was wetting the leaves), I placed the pot on a tray filled with water and pebbles. It keeps the air around the plant humid without actually getting the leaves wet.
Pruned the Infected Leaves
Any leaves with black spots had to go. I used sterilized scissors and made sure to cut only the affected parts to avoid spreading the fungus.
Used Fungicide
As a last resort, I applied a plant-safe fungicide. It helped clear up the spots pretty quickly, and I made sure to follow the instructions carefully to avoid overdoing it.
Quick Tip
Good airflow around the plant is key to keeping fungus at bay. If you can, place your Peace Lily somewhere with decent air circulation.
3. Cold Drafts
Black spots caused by cold drafts typically appear on leaves closest to windows, doors, or air vents where the plant is exposed to sudden temperature changes. These spots are often uneven, affecting only certain leaves, and may be accompanied by limp or dry, papery textures. If the spots show up during colder months or after moving the plant near a drafty area, it’s a strong sign of temperature stress. Relocating the Peace Lily to a warmer, draft-free spot can prevent further damage.
How to fix it
Moved It to a Warmer Spot
Place the Peace Lily away from cold windows, doors, or air vents, especially during winter.
Maintained a Steady Temperature
Keep the room temperature between 65-80°F (18-27°C) to support healthy growth and prevent stress caused by temperature fluctuations.
Quick Tip
A few black spots can mean it’s time to double-check for drafts. If your plant is near an AC vent or window, consider moving it to a more stable spot, especially in cooler months.
4. Sunburn: Peace Lilies Don’t Love Direct Sunlight
Black spots from sunburn on Peace Lilies usually develop on leaves exposed to direct sunlight for extended periods. These spots appear as dry, dark patches, often with a crisp, scorched texture. The affected areas may turn yellow or brown before becoming black. Sunburn typically occurs on the side of the plant facing the window or light source, especially if the sunlight is intense. If your Peace Lily is near a south or west-facing window without a curtain or shade, sunburn is likely the cause.
How to fix it
Moved It to Indirect Light
Find a nice spot with bright, indirect light. North or east-facing windows are usually best, where the plant still gets enough light but not harsh rays.
Rotated the Pot
Peace Lilies sometimes lean toward the light source. Rotating the pot every couple of weeks helps to keep all sides even and avoids that burnt look on any one part.
A few black spots can mean it’s time to double-check for drafts. If your plant is near an AC vent or window, consider moving it to a more stable spot, especially in cooler months.
5. Bacterial Leaf Spot: Another Common Culprit
Black spots caused by bacteria usually start as small, wet-looking patches that darken to black or brown over time. These spots often have a yellowish halo and may feel soft or mushy to the touch. Bacterial infections spread quickly, especially in humid conditions or when water splashes onto the leaves. Check if the plant has been overwatered, has poor airflow, or if leaves stay wet for long periods after watering. If multiple leaves show similar symptoms and the spots are spreading, it’s likely bacterial.
How to Fix It
Removed Affected Leaves
Trimming the affected leaves is a must, so immediately trim any infected leaves to prevent the bacteria from spreading.
Avoided Wetting the Leaves
You must be extra careful not to wet the leaves. Keeping them dry helps prevent bacterial spread.
If black spots keep showing up, a copper-based bactericide can help. Just be sure to use it sparingly, as it can be strong for indoor plants.
6. Fertilizer Burn
Black spots caused by over-fertilization often appear as dark, crispy patches, usually at the edges or tips of the leaves. These spots may be accompanied by browning or yellowing around the edges, indicating “fertilizer burn.” Other signs include a white crust on the soil surface or excessively fast growth with weak or unhealthy foliage. If you’ve recently fertilized your Peace Lily or used a strong or undiluted fertilizer, over-fertilization could be the cause. How to fix fertilizer burn
How to Fix
Flushed the Soil
Give the soil a good flush by running water through it for a few minutes. This helped wash out excess nutrients, giving the roots a fresh start.
Cut Back on Feeding
Reducing the amount or frequency of fertilizer to prevent overloading your Peace Lily with nutrients. Use a diluted fertilizer at half or quarter strength and space feedings every 6-8 weeks during spring and summer. Avoid feeding in fall and winter when growth slows.
Use fertilizer at half the recommended strength. Trust me, your Peace Lily will still get what it needs without risking those nasty black spots.
7. Normal Aging
Black spots from aging usually appear on the oldest leaves, which are located at the base of the plant. These spots are often small, dark, and dry and may spread across the leaf as it naturally dies off. Alongside the spots, the leaf may turn yellow or brown and feel limp or papery. Unlike issues caused by disease or environmental factors, aging-related spots don’t spread to newer leaves. If only the older leaves are affected and the rest of the plant looks healthy, it’s likely just a natural part of the plant’s life cycle. Simply trim off the dying leaves to keep your Peace Lily looking fresh.
How to treat old leaves
Pruned Off Older Leaves
I trimmed any leaves that were turning black or yellow. This not only made the plant look neater, but it also allowed it to put energy into new growth.
Focus on Basic Care
Keeping up with a steady care routine of watering, light, and feeding has helped keep my Peace Lily looking fresh.
Don’t stress if a couple of leaves get spots or discolor over time. As long as the rest of the plant looks healthy, it’s probably just part of the natural aging process.
Preventing Black Spots: My Go-To Routine
Here’s my simple and effective checklist to make sure those pesky black spots don’t come back. You can also follow them so your Peace Lily can stay healthy and beautiful, just like mine did after a little extra care.
- I make sure the top inch of soil is dry before watering. It’s a simple test that helps me avoid overwatering.
- Instead of misting, I use a pebble tray to keep the air around my plant humid. It’s a gentler way to boost humidity without creating wet leaves.
- I keep my Peace Lily in a spot with bright, indirect light. I’ve learned to avoid direct sunlight to prevent sunburn, especially in those hot summer months.
- I make sure it stays in a cozy spot, away from drafts or places with fluctuating temperatures.
- I use a little bit of fertilizer every 6-8 weeks, just enough to keep my Peace Lily thriving without overfeeding it.
Seeing black spots on your Peace Lily can be a bit alarming, but trust me; it’s often easy to fix with a few adjustments. With the right care routine, your Peace Lily can bounce back and be as lush and beautiful as ever. Remember, every plant is unique, and learning its quirks is half the fun of plant parenting!
Frequently Asked Question
Can a peace lily be outside?
Yes, a peace lily can grow outside in a warm, shaded spot. It doesn’t like direct sunlight or cold weather, so it’s best for tropical or mild climates. Keep the soil moist but not soggy.


